Extract Survey Outlines
The ‘Extract Survey Oultines’ tool is for extraction of survey outlines from input survey data in raster formats.
Tool_A: Full Bathymetry
- Tool_A is for derivation of Survey Coverage using one or multiple fix-resolution BAG/GeoTIFF elevation layers as input data.
- Make sure that each input BAG/GeoTIFF file contains a band with band_name = ‘Elevation’.
- Make sure that input BAG/GeoTIFF files have the same projection. Cell-sizes of diffferent elevation layers can be different
- Make sure that NoData value is set in input BAG/GeoTIFF files
- The holiday SHP file is created by QC Tools 2. Each SHP point file corresponds to a unique BAG file. Please keep the default file name.
- Click ‘Add Metadata’ button and input metadata through UI before clicking ‘Start Conversion’ button
- Metadata items are added into the attribute table of the vector layer in the GeoPackage
Tool_B: Variable Resolution
- Tool_B is for derivation of Survey Coverage using one variable resolution BAG elevation layer as input data.
- Make sure that input variable resolution BAG file contains a band with band_name = ‘Elevation’.
- Make sure that NoData value is set in the input variable resolution BAG file
- The holiday SHP file is created by QC Tools 2. The SHP point file corresponds to the BAG file. Please keep the default file name.
- Click ‘Add Metadata’ button and input metadata through UI before clicking ‘Start Conversion’ button
- Metadata items are added into the attribute table of the vector layer in the GeoPackage
Tool_C: Mixed Coverage
- Tool_C is for conversion of the coverage of sidescan raster (200% i.e. overlapped areas are calculated if two sidescan rasters are provided) plus multibeam raster and save results as a GeoPackage vector layer
- Make sure that each input sidescan GeoTIFF file contains data in band 1 for coverage derivation
- Make sure that input multibeam BAG file contains a band with band_name = ‘Elevation’.
- Make sure that sidescan and multibeam rasters have the same resolution (cell-size) and projection
- Make sure that NoData value is set in input BAG/GeoTIFF files
- Click ‘Add Metadata’ button and input metadata through UI before clicking ‘Start Conversion’ button
- Metadata items are added into the attribute table of the vector layer in the GeoPackage
Tool_D: Partial Bathymetry (Set Line Spacing)
- Tool_D is for derivation of Survey Coverage by allowing the user to set line spacing using one fix-resolution BAG/GeoTIFF elevation layer as input data.
- Make sure that each input BAG/GeoTIFF file contains a band with band_name = ‘Elevation’.
- Make sure that NoData value is set in input BAG/GeoTIFF file
- Click ‘Add Metadata’ button and input metadata through UI before clicking ‘Start Conversion’ button
- Metadata items are added into the attribute table of the vector layer in the GeoPackage
The ‘Extract Survey Outlines’ tool has been tested on Python 2 under Pydro in Windows 10 installed on a NOAA laptop. The laptop has 16 GB installed memory (15.9 GB usable), with Intel(R) Core(TM) i7-5600U CPU @ 2.60GHz 2.59 GHz.
Note: Survey outlines of one multibeam BAG/GeoTIFF can be extracted using Tool_A.
Tool_A
Click “Add Input BAG/GeoTIFF” button to add one or multiple BAG/GeoTIFF files at one time.
Click “Add Holiday SHP” button to add one or multiple SHP files at one time. Note that Tool_A can be ran without using a holiday file. Tool_A pops up a warning message if holiday SHP files are not available, but allows the user to proceed without holiday SHP files.
Click “Add Output GPKG” button to set full path of the output gpkg.
The default value of Simplification Tolerance is 0 meter i.e. no simplification will be applied to the output vector layer in the gpkg by default. The value is editable. If the value is greater than zero, survey outlines are simplified while preserving topology.
Click “Clear Selection” button to clear the selected file list in the UI.
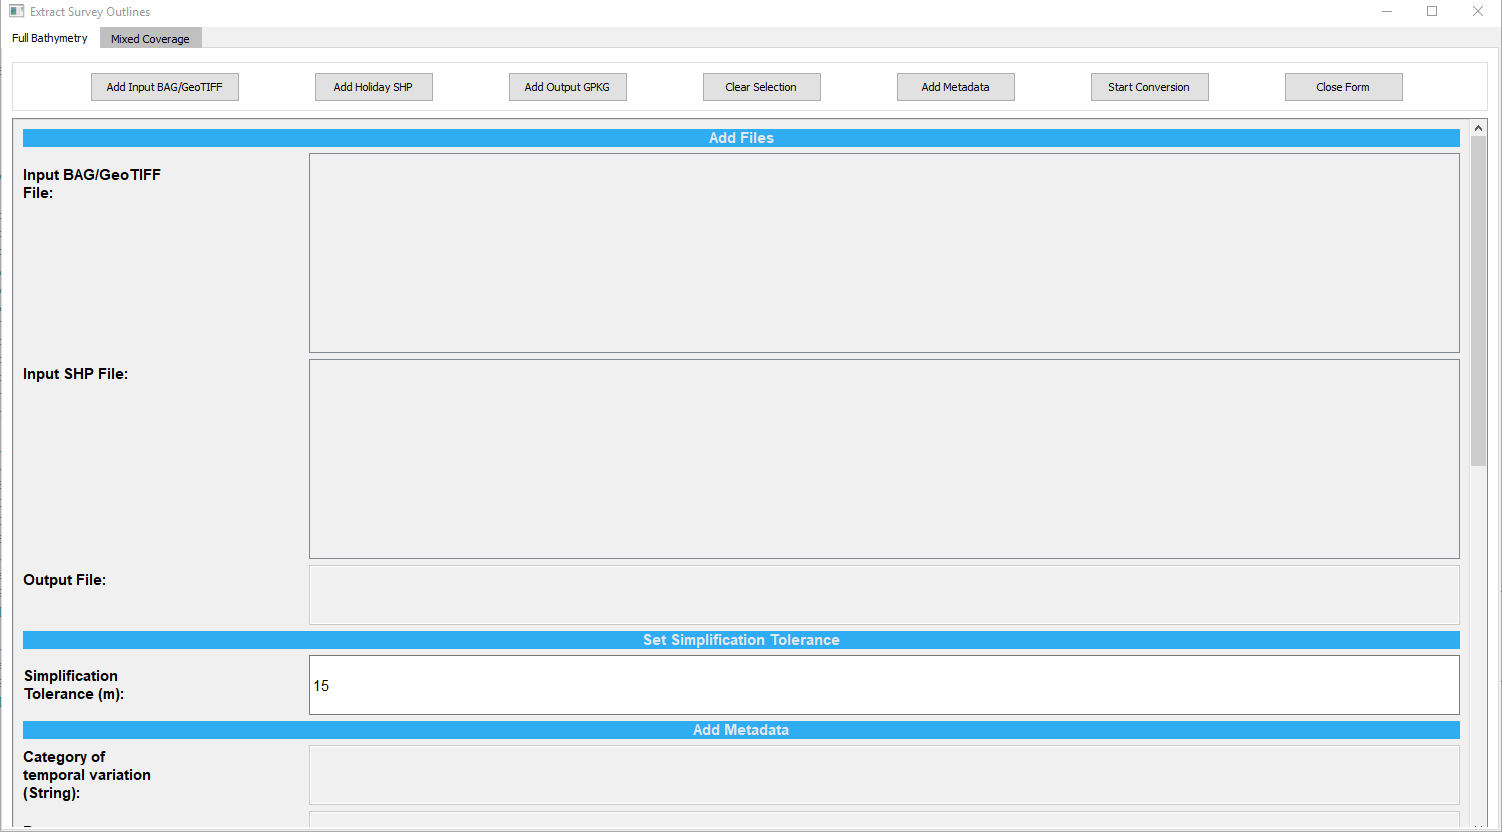
Fig. 9 Tool_A user interface: Part I
Click “Add Metadata” button to enable adding metadata items through the UI.
In the current version, the following metadata items can be added into the attribute table:
-Category of temporal variation (String)
-Data assessment (String)
-Features detected (Boolean: 0 as False, 1 as True)
-Least depth of detected features measured (Boolean: 0 as False, 1 as True)
-Significant features detected (Boolean: 0 as False, 1 as True)
-Size of features (Float)
-Full seafloor coverage achieved (Boolean: 0 as False, 1 as True)
-Full bathymetry coverage achieved (Boolean: 0 as False, 1 as True)
-Horizontal position uncertainty (Float)
-Survey start date (String)
-Survey end date (String)
-Vertical uncertainty fixed (Float)
-Vertical uncertainty variable (Float)
The default value for each metadata item is <Null>.
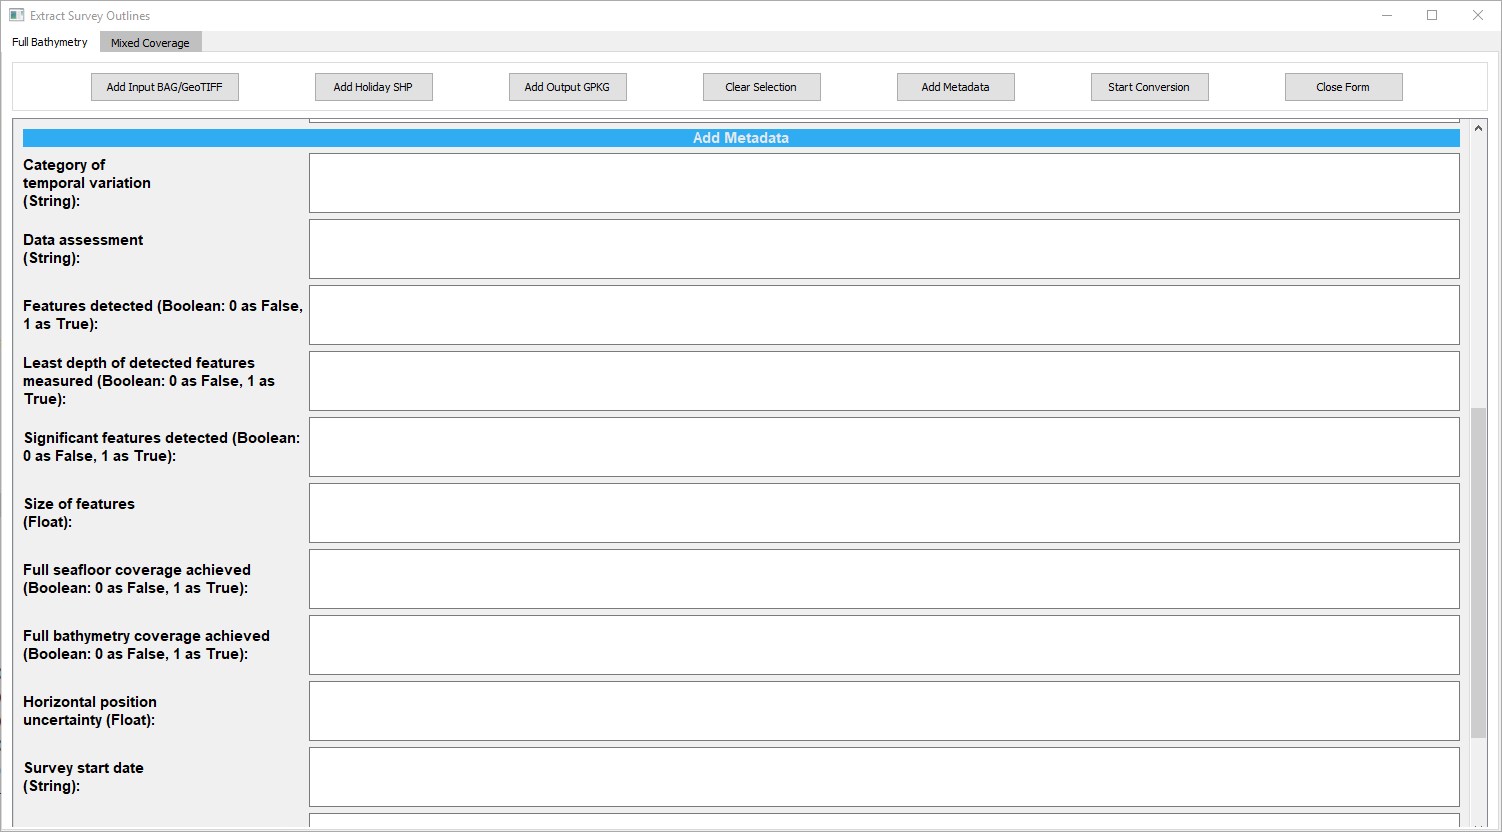
Fig. 10 Tool_A user interface: Part II
Click “Start Conversion” button to run the program for creation of survey outlines.
A progress bar will appear to show the progress of the program running. Once complete, a pop message box will appear to show the full path of the output gpkg.
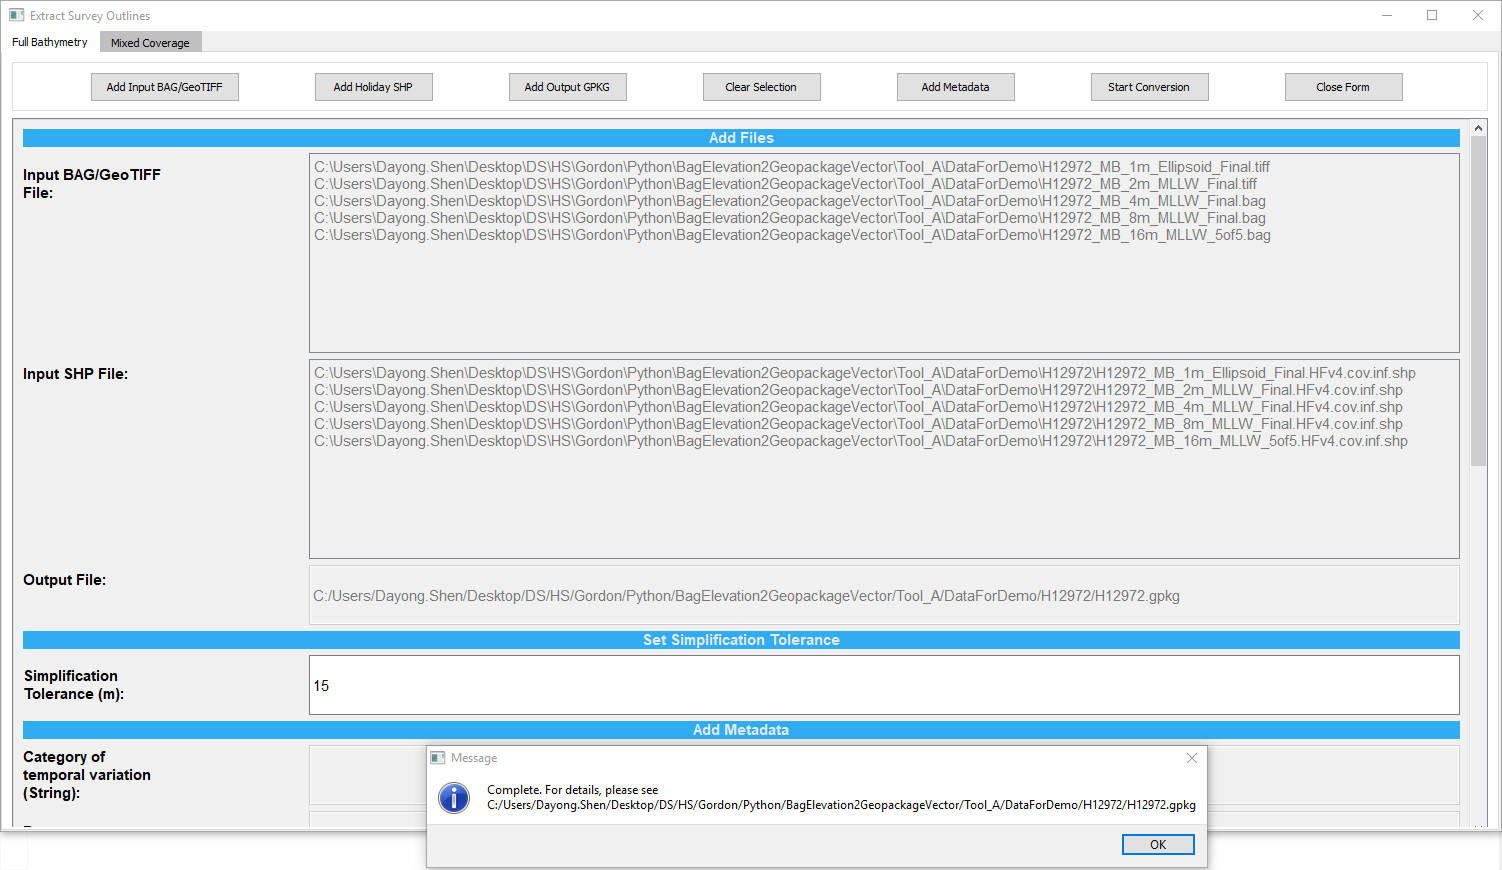
Fig. 11 Tool_A user interface: Part III
The output gpkg contains survey outlines of each input BAG/GeoTIFF.
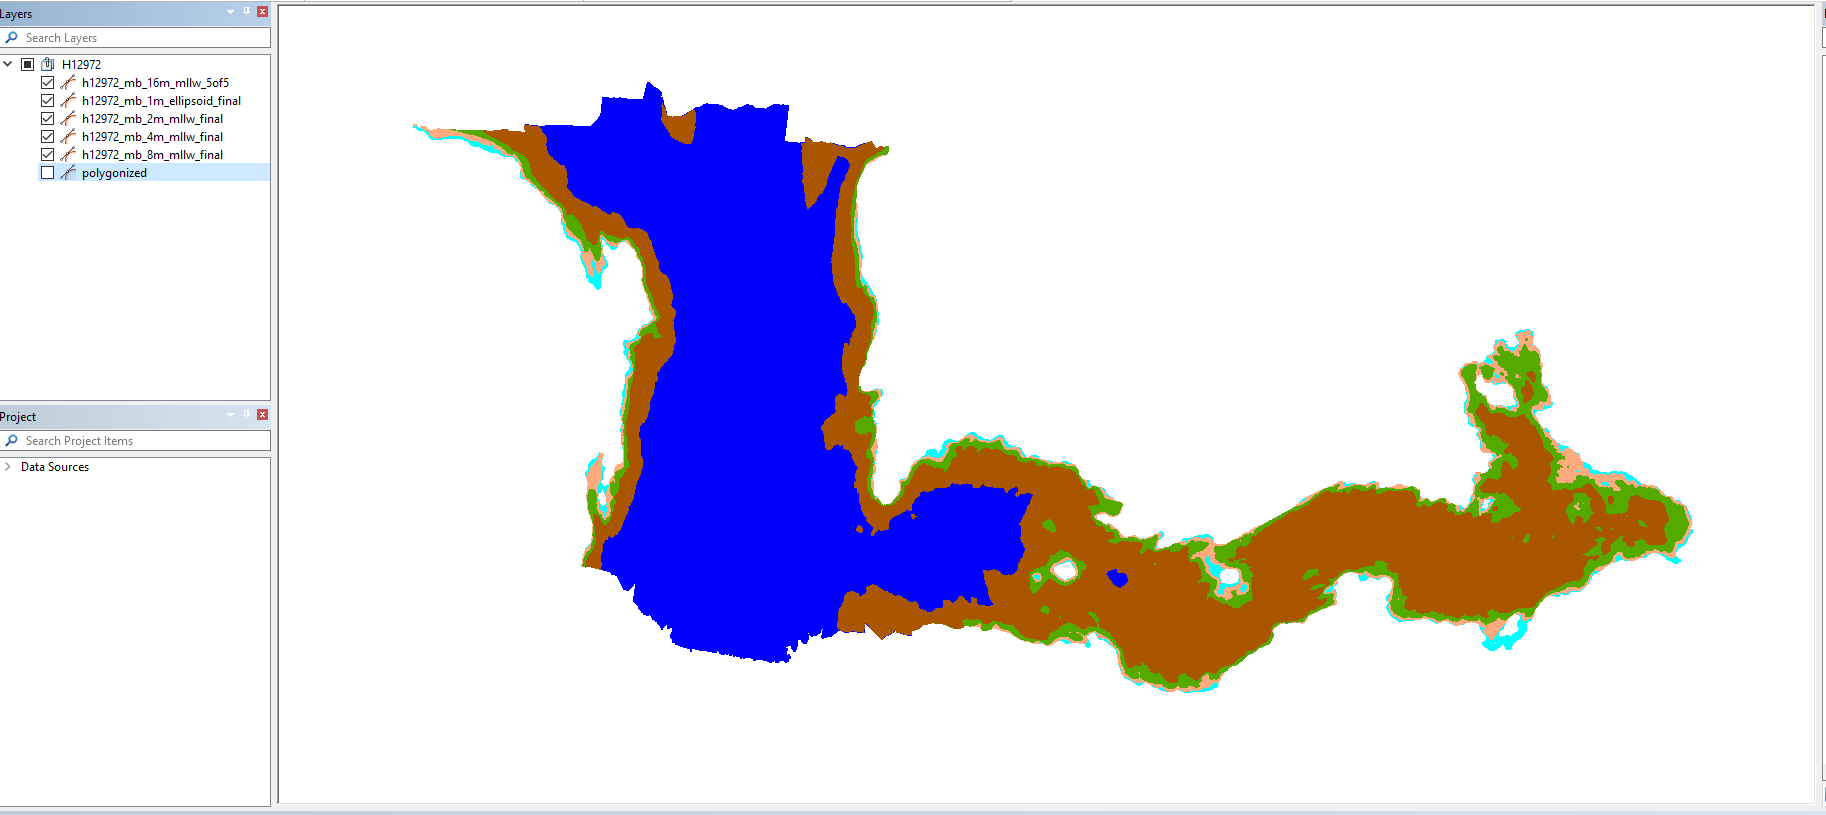
Fig. 12 Tool_A user interface: Part IV
The output gpkg also contains ‘polygonized’ vector layer, which is the final survey outlines with simplification.
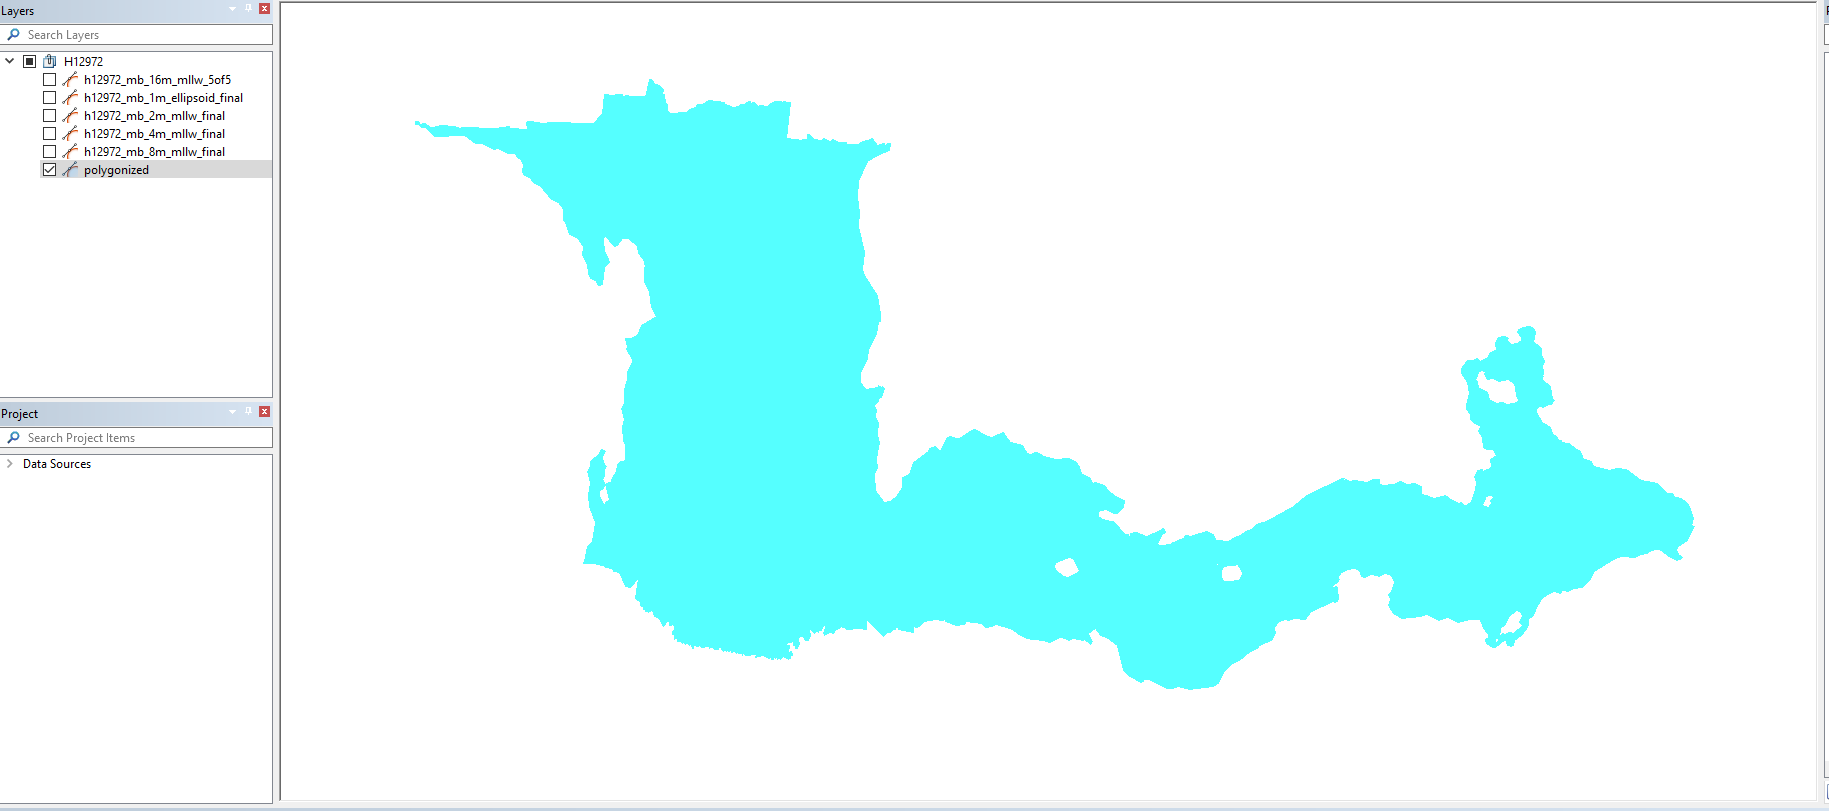
Fig. 13 Tool_A user interface: Part V
Click “CLose Form” button to close the UI.
Tool_C
Click “Add Sidescan GeoTIFF” button to add one or two GeoTIFF files at one time. Note that Tool_C allows the user to set NoData value through user interface and save the value into the input raster band if the value is not set yet.
Click “Add Multibeam BAG” button to add a BAG file.
Click “Add Output GPKG” button to set full path of the output gpkg.
The default value of Simplification Tolerance is 0 meter i.e. no simplification will be applied to the output vector layer in the gpkg by default. The value is editable. If the value is greater than zero, survey outlines are simplified while preserving topology.
Click “Clear Selection” button to clear the selected file list in the UI.
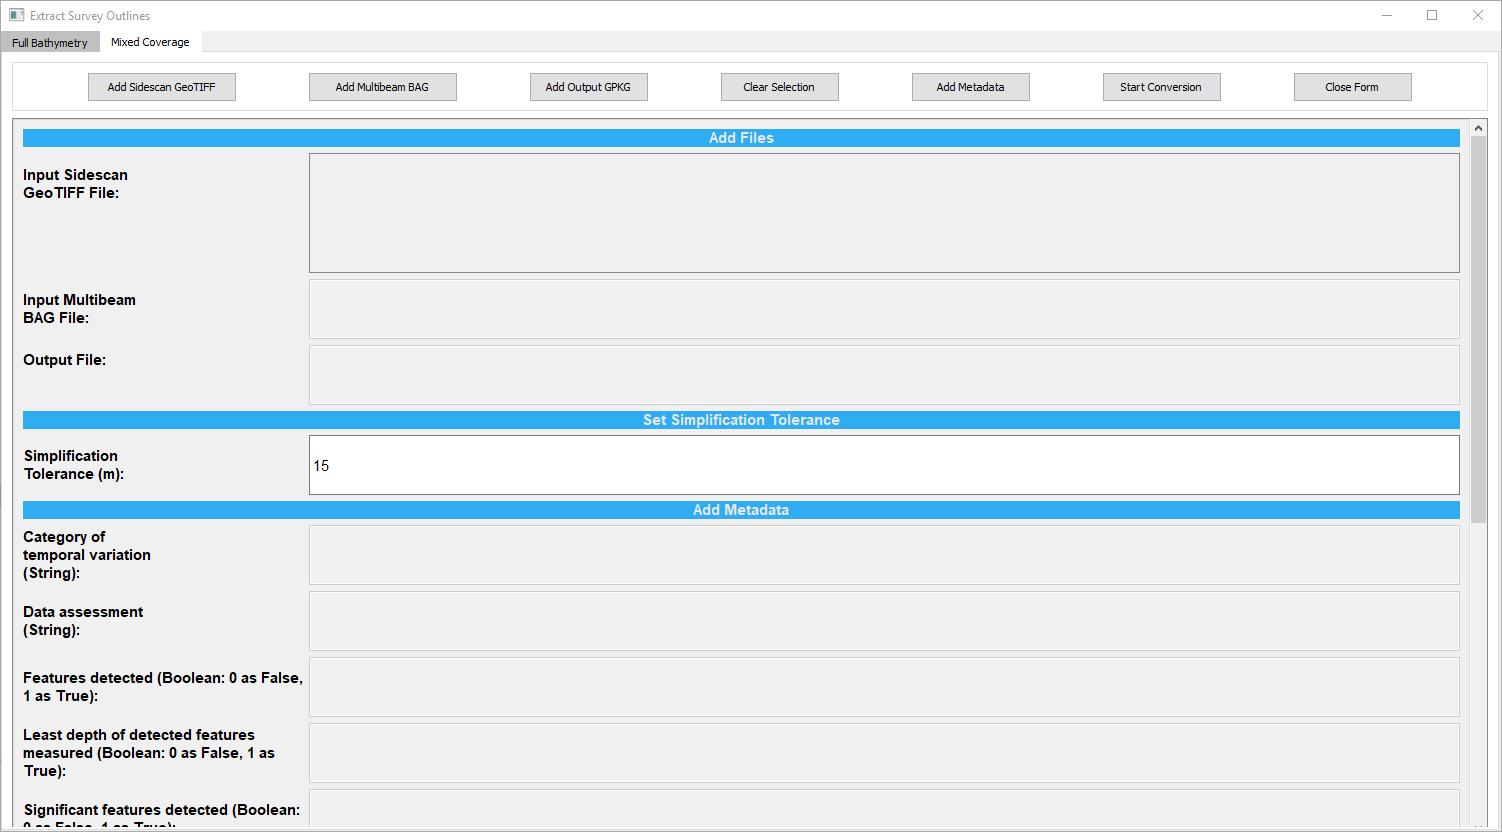
Fig. 14 Tool_C user interface: Part I
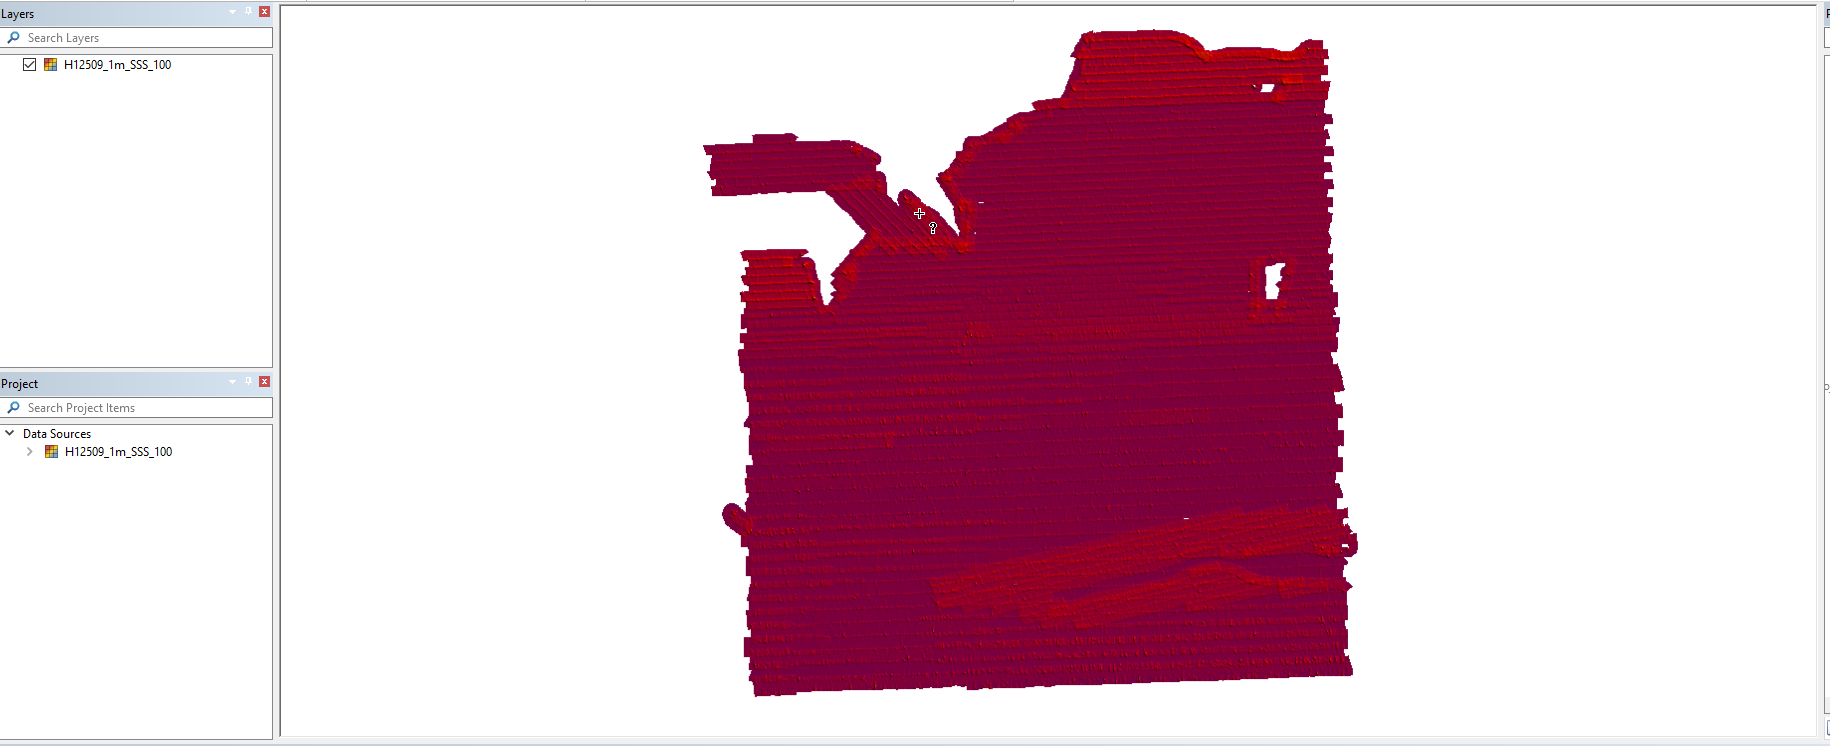
Fig. 15 Tool_C user interface: Part II
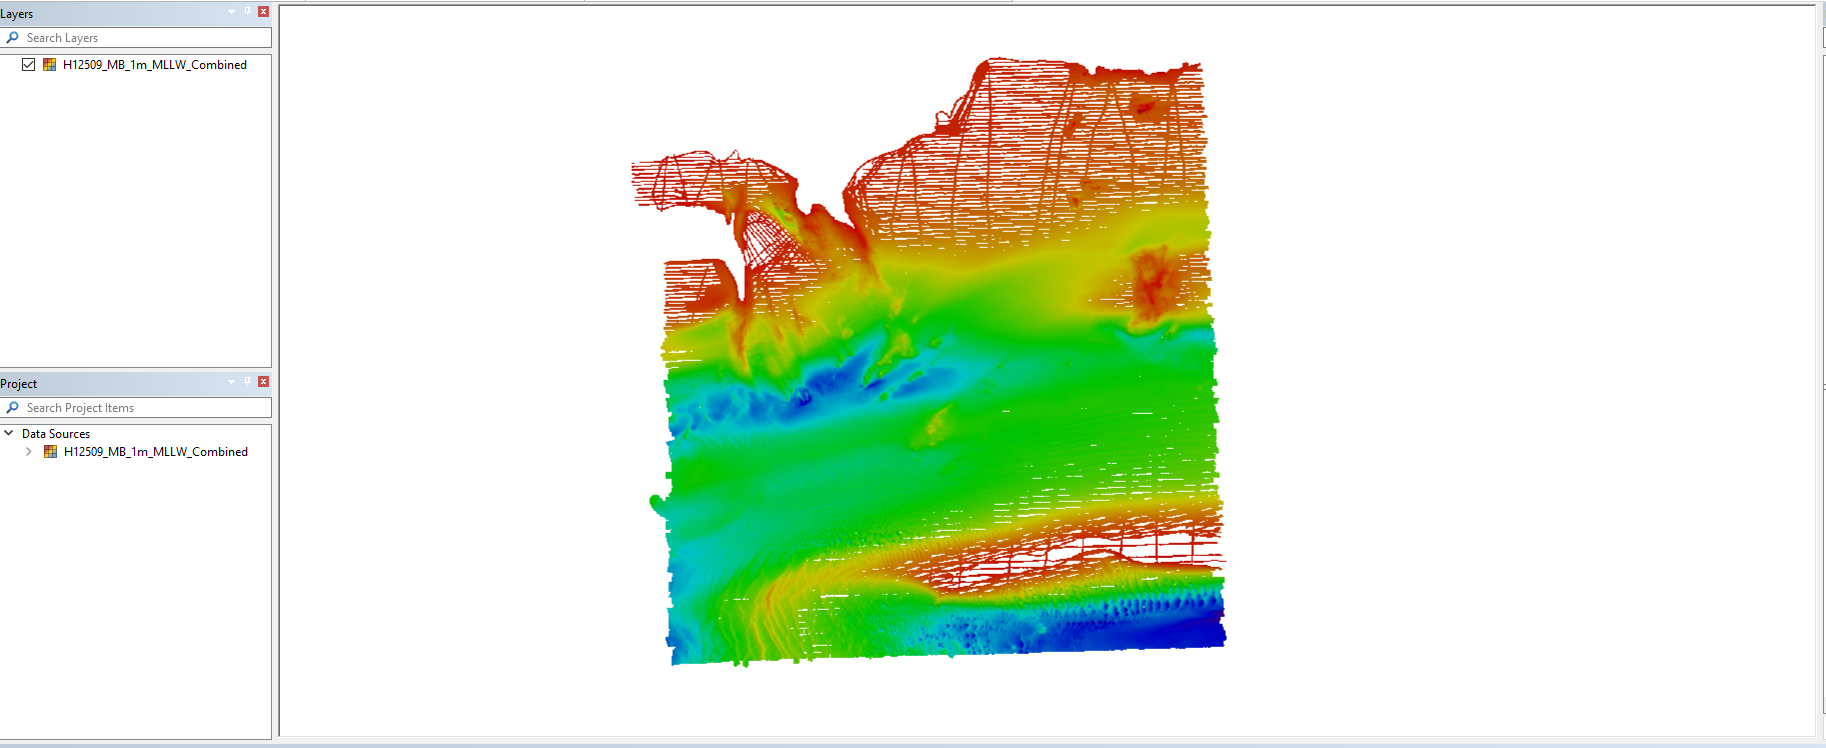
Fig. 16 Tool_C user interface: Part III
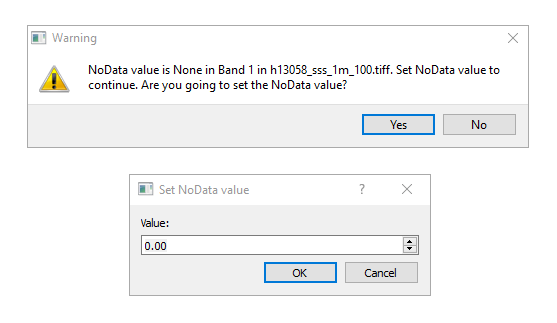
Fig. 17 Tool_C user interface: Part IV
Click “Add Metadata” button to enable adding metadata items through the UI.
Click “Start Conversion” button to run the program for creation of survey outlines.
A progress bar will appear to show the progress of the program running. Once complete, a pop message box will appear to show the full path of the output gpkg.
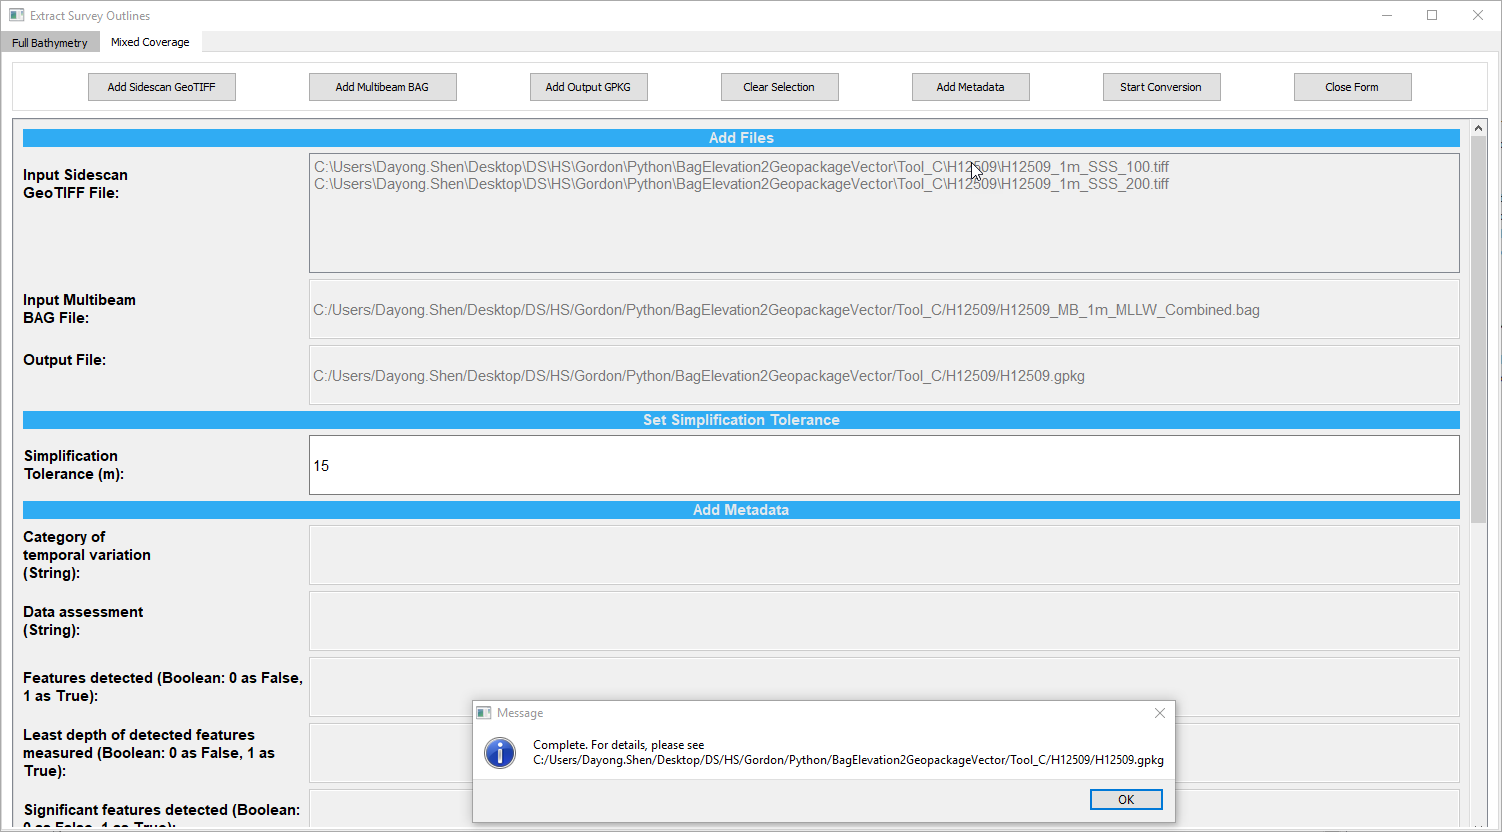
Fig. 18 Tool_C user interface: Part V
The output gpkg contains ‘polygonized’ vector layer, which is the final survey outlines with simplification.
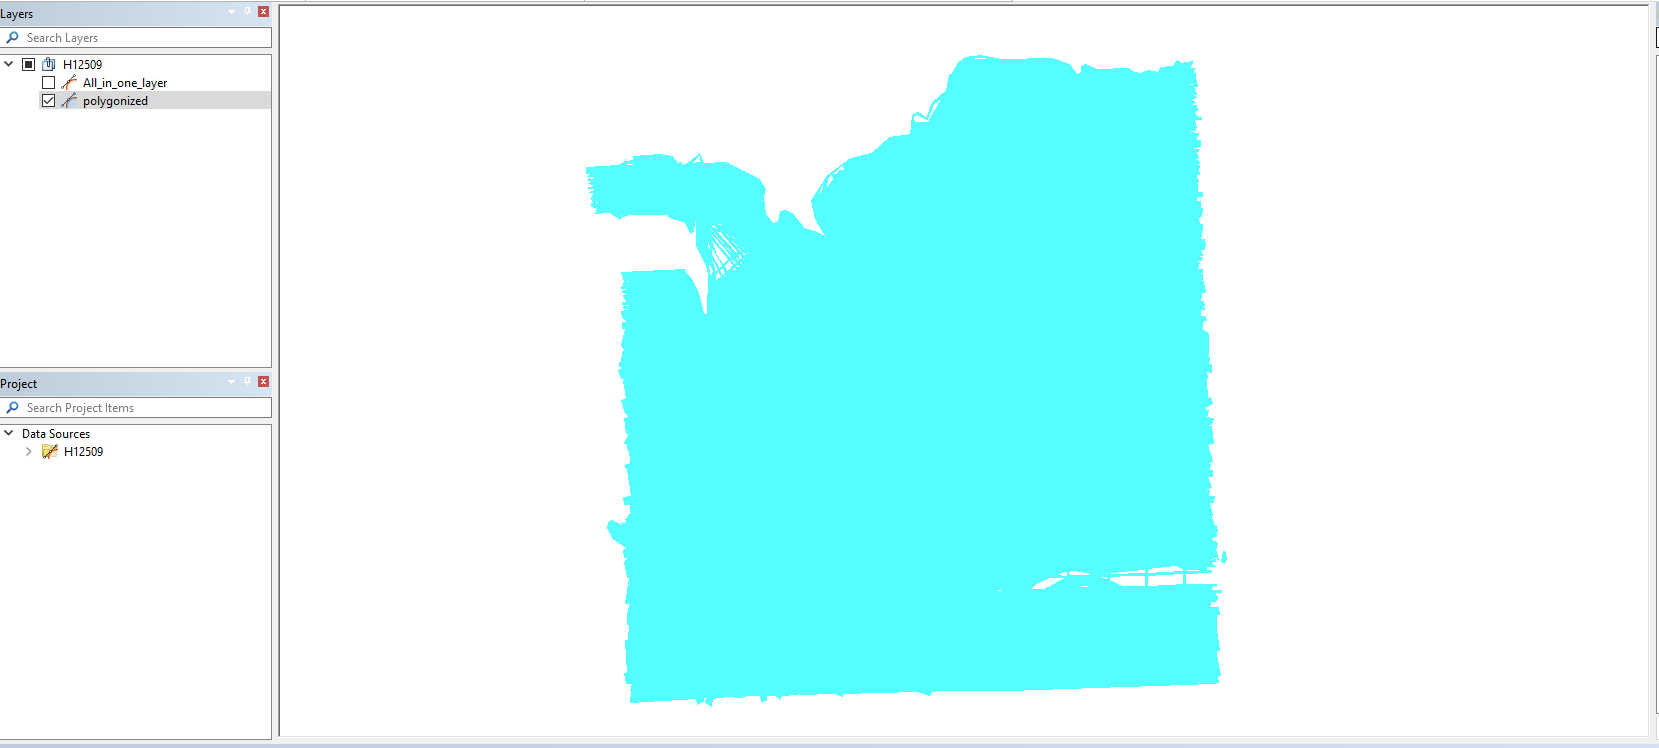
Fig. 19 Tool_C user interface: Part VI
Click “CLose Form” button to close the UI.
Changes list:
8-17-2018:
- Tool_A can be ran without using a holiday file. Tool_A pops up a warning message if holiday SHP files are not available, but allows the user to proceed without holiday SHP files.
- Not assume that NoData value >= 1000000 in an input BAG/GeoTIFF file.
8-24-2018:
- Tool_C allows the user to set NoData value through user interface and save the value into the input raster band if the value is not set yet.
- Tool_C handles big input raster.
- Rename Tool_A from ‘Convert the Coverage of Fixed-resolution BAG/GeoTIFF Elevation Layer(s) to GeoPackage Vector’ to ‘Full Bathymetry’, rename Tool_C from ‘Convert the Coverage of Sidescan with Multibeam to GeoPackage Vector’ to ‘Mixed Coverage’.
- Reset the default value of Simplification Tolerance to 0.
8-29-2018:
Tool_D has been added.
8-31-2018:
Tool_B has been added.
Resources
- Online Resources:
Contact
If you find errors in the documentation or want to contribute, you are encouraged to email the following personnel emails @NOAA.GOV
- barry.gallagher
- jack.riley
- chen.zhang
- eric.younkin
